
さくらぼ大阪校オンライン
受講生専用■ 本日の教材
1分タイピング POPタイピング 寿司打
Scratch microbit arcade Roblox
(1)タイピング結果を記録する
第1回目のタイピング記録をする
第2回目のタイピング記録をする
(2)ミニスキル
準備:WorkspaceにScriptを追加して行う
① 出力スキル 命令書式: print(出力したいもの)
文字を表示したい print(“roblox”) ポイント→ ””で囲みます
文字以外を表示したい print(5)
Lv1 プログラミング と出力したい
Lv2 100 と出力したい
Lv3 500+200の計算結果を出力したい
Lv4 10と5で四則演算(+,-,*,/)をさせてみよう
② 記憶スキル(変数)
命令書式: local 変数名 = 覚えさせたいもの
※変数名はアルファベット小文字でわかりやすいもの
local kazu = 10 数字を覚える
local moji = ”a” 文字を覚える
Lv1 変数suに100を記憶させたい
Lv2 変数nameに「taro」を記憶させたい
Lv3 Lv1の変数suの中身を出力したい
Lv4 Lv2の変数nameの中身を出力したい
Lv5 オブジェクトを覚える
local pt = Instance.new(“Part”) オブジェクトを覚える
pt.Parent = game.Workspace オブジェクトを表示
※パーツの形を変えるには、下記を追加します
pt.Shape = Enum.PartType.Ball
※Ball(球体) Block(立方体) Cylinder(円柱) ConerWedge(三角形) Wedge()
local pt = Instance.new("Part")
pt.Parent = game.Workspace
local pt = Instance.new("Part")
pt.Parent = game.Workspace
pt.Shape = Enum.PartType.Ball③ 繰り返しスキル① ~指定した回数繰り返す

【○回繰り返すの命令文】
for 初期値,終了 do
  繰り返したい命令
end
for i=1,10 do
local pt = Instance.new("Part")
pt.Parent = game.Workspace
pt.Shape = Enum.PartType.Block
end④ 条件分岐① ~条件に基づいて異なる動きをさせる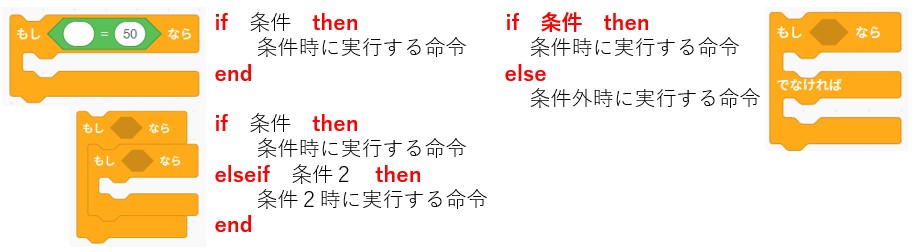
for i=1,10 do
	local pt = Instance.new("Part")
	pt.Parent = game.Workspace
	pt.Shape = Enum.PartType.Block
	if i % 2 == 0 then
		pt.Shape = Enum.PartType.Ball
		print(i)
	end
end
■ミッション①「天から隕石?」
for i=1,100 do
	local pt = Instance.new("Part")
	pt.Shape = Enum.PartType.Ball
	pt.Parent = game.Workspace
	pt.Position = Vector3.new(0,100,0)
end
乱 数: math.random(1,10) 1~10までの乱数
時 間: task.wait(5) 〇秒待つ
サイズ: pt.Size = Vector3.new(10, 5, 2)
位 置: pt.Position = Vector3.new(0,100,0)
マテリアル:pt.Material = Enum.Material.Wood
チャレンジ: 異なる位置から落ちてくるようにしよう
local function onPartTouch(otherPart)
	local humanoid = otherPart.Parent:FindFirstChild("Humanoid")
	if humanoid then
		humanoid.Health = 0
	end
end

for i=1,100 do
	local pt = Instance.new("Part")
	pt.Shape = Enum.PartType.Ball
	pt.Material = Enum.Material.Cardboard
	pt.Parent = game.Workspace
	pt.Position = Vector3.new(math.random(-50,50),100,math.random(-50,50))
	s=math.random(1,10)
	pt.Size = Vector3.new(s,s,s)
	task.wait(0.1)
	pt.Touched:Connect(onPartTouch)
end
◆ミッション② 爆弾から逃げろ
(1)爆弾パーツをつくる
local bomb = script.Parent
local jikan = 10 -- 爆発までの時間(秒)

task.wait(jikan) -- 時限タイマー起動
local explosion = Instance.new("Explosion") -- Robloxの爆発用オブジェクト作成

-- 爆弾の設定
explosion.BlastRadius = 20 -- 爆発の範囲(半径)を決める
explosion.BlastPressure = 50 -- 爆風の圧力(押しの強さ)を決める
explosion.Position = bomb.Position -- 爆発位置を爆弾パーツの位置に合わせる
explosion.Parent = game.Workspace -- 爆発を世界に表示

-- 爆発音や視覚効果を追加したい場合はここに追加可能
-- 例: game.Workspace.SoundFolder.ExplosionSound:Play()

-- 爆弾パーツを削除
bomb:Destroy()
--爆発時に地面に穴をあけたい
explosion.ExplosionType = Enum.ExplosionType.Craters
--爆発音をつけたい
--1)モデルの「オーディオ」の音で右クリックすると「アセットID」がコピーできる
--2)"rbxassetid://133421015579424"の数字に貼り付ける
local sound = Instance.new("Sound")
sound.SoundId = "rbxassetid://133421015579424" -- 爆発音ID
sound.Volume = 5
sound.PlayOnRemove = false
sound.Parent = script.Paren
sound:Play()
-- 爆弾パーツを削除
sound.Ended:Wait() -- パーツを消す前に入れる
bomb:Destroy()
◆ミッション③ 地形パーツ?
--ServerScriptServiceにScriptを作って記述する

local workspace = game:GetService("Workspace")

local material = Enum.Material.Water -- パーツの素材
local cframe = CFrame.new(0, 0, 50)  -- パーツの位置
local size = Vector3.new(50, 50, 50) -- パーツのサイズ
workspace.Terrain:FillBlock(cframe, size, material)
 -- FillBlock(四角)  FillWedge(三角柱)
--球体にしたい
local position = Vector3.new(-100, 0, 100) -- パーツの位置
local radius = 25 -- パーツの半径
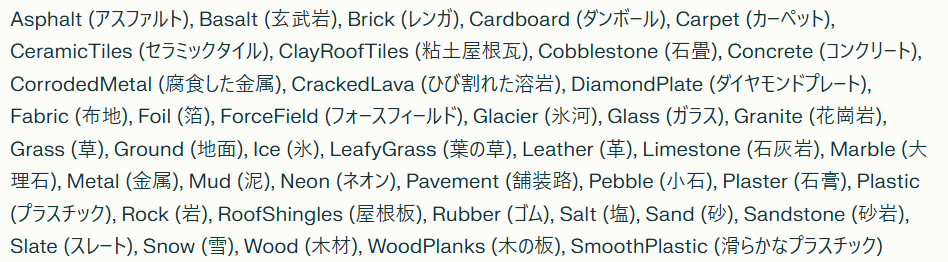
workspace.Terrain:FillBall(position, radius, material) ★素材一覧
Grass(草地),Rock(岩),Soil(土),Sand(砂),Snow(雪),Mud(泥),Ground(地面),Basalt(玄武岩)
CrackedLava(割れた溶岩),Lava(溶岩)
Wood(木材),WoodPlanks(木の板),GreyWoodPlanks(灰色木板)
Concrete(コンクリート),Brick(レンガ),Asphalt(アスファルト),Pavement(舗装)
Metal(金属),Silver(銀),Gold(金),CorrodedMetal(錆びた金属),Rust(錆),Slate(石板)
Plastic(プラスチック),Neon(ネオン),ForceField(フォースフィールド)
Glass(ガラス),Ice(氷)
Fabric(布),Padding(パッド)
Water(水),SmoothPlastic(滑らかなプラスチック),Marble(大理石),Pebble(小石),Foil(箔)
DiamondPlate(ダイヤモンドプレート),Granite(花崗岩)◆ミッション3
(1)アイテムを使えるようにするには?
手順① アイテムをつくる
手順② プレイヤが持てるようにする
手順③ 装備して、クリックすると効果がでる(Script)
★サンプル1
手順① StarterPack → +ボタン → Tool を選ぶ
手順② Tool → +ボタン → Part を選ぶ(Partの名前をHandleにする)
手順③ Tool → +ボタン → Script を選ぶ
-- アイテムをつかう
local tool = script.Parent
tool.Activated:Connect(function()
	print("使ったよ!")
end)
-- タマをだす
local tool = script.Parent
tool.Activated:Connect(function()
local character = tool.Parent
local humanoidRootPart = character:FindFirstChild("HumanoidRootPart") --体の中心(位置と向きがわかるパーツ)
if humanoidRootPart then
-- 弾を作る
local bullet = Instance.new("Part")
bullet.Size = Vector3.new(0.5, 0.5, 0.5) --小さい球にする
bullet.Shape = Enum.PartType.Ball --形を「球」にする
bullet.BrickColor = BrickColor.new("Bright yellow") --色を黄色にする
bullet.Material = Enum.Material.Neon --光る素材にする
bullet.Position = humanoidRootPart.Position + humanoidRootPart.CFrame.LookVector * 2 --少し前に弾を出している
bullet.Parent = workspace
-- 弾を動かす
local velocity = Instance.new("BodyVelocity") --動かすための「力」を作る
velocity.Velocity = humanoidRootPart.CFrame.LookVector * 100 --前に向かって飛ばす
velocity.MaxForce = Vector3.new(10000, 10000, 10000) --強さ(これがないと動かない)
velocity.Parent = bullet
-- 3秒後に消す
game:GetService("Debris"):AddItem(bullet, 3)
end
end)-- タマをだす(当たり判定つき)
local tool = script.Parent
tool.Activated:Connect(function()
local character = tool.Parent
local humanoidRootPart = character:FindFirstChild("HumanoidRootPart")
if humanoidRootPart then
-- 弾を作る
local bullet = Instance.new("Part")
bullet.Size = Vector3.new(0.5, 0.5, 0.5)
bullet.Shape = Enum.PartType.Ball
bullet.BrickColor = BrickColor.new("Bright yellow")
bullet.Material = Enum.Material.Neon
bullet.Position = humanoidRootPart.Position + humanoidRootPart.CFrame.LookVector * 2
bullet.Parent = workspace
-- 🆕 当たり判定フラグ
local hitAlready = false
-- 🆕 当たったとき
bullet.Touched:Connect(function(hit)
if hitAlready then return end
local hitCharacter = hit.Parent
local humanoid = hitCharacter:FindFirstChild("Humanoid")
-- 自分以外に当たったら
if humanoid and hitCharacter ~= character then
hitAlready = true
humanoid:TakeDamage(20) -- ダメージ
bullet:Destroy() -- 弾を消す
end
end)
-- 弾を動かす
local velocity = Instance.new("BodyVelocity")
velocity.Velocity = humanoidRootPart.CFrame.LookVector * 100
velocity.MaxForce = Vector3.new(10000, 10000, 10000)
velocity.Parent = bullet
-- 3秒後に消す
game:GetService("Debris"):AddItem(bullet, 3)
end
end)(2)アイテム(銃)を使う
【Robloxの公式銃】スクリプトは予め組み込まれている(公式のものはクリエイター名がRoblox)
1)Pistol ピストル
2)Shotgun ショットガン
3)Auto Rifle オートライフル
4)Submachine Gun サブマシンガン
5)Sniper Rifle スナイパーライフル
6)Crossbow クロスボウ
7)Grenade Launcher グレネードランチャー
8)Rocket Launcher ロケットランチャー
9)Railgun レールガン
手順① モデルから銃を選ぶ
「StarterPackにこのツールを入れますか?」→ はい を選ぶ
※銃を持っている時は、カメラアングルが固定される
※左クリックで発射
手順② 敵キャラゾンビを配置する
【Roblox公式NPC】※プレイヤ以外のキャラクタをNPC(Non Player Character)という
1)Drooling Zombie ゾンビ
2)Soldiers 兵士
3)RO-01 Robots ロボット
4)NP-C 9000 Robots ロボット
★チャレンジ: 銃の威力を変えよ!
StarterPack → AR → Configuration → HitDamage → Value(攻撃力)
◆ミッション4 タイトルをつける
画面表示はクライアント(自分のPC)で行うので、下記の所にプログラムを作ります
作る場所: 「StarterPlayer」→「StarterPlayerScripts」→「LocalScript」
local screenGui = Instance.new("ScreenGui") --表示のハコをつくる
screenGui.Name = "StartGui"                 --名前をきめる
screenGui.ResetOnSpawn = false              --リスポーン時に消えないようにする
screenGui.Parent = game.Players.LocalPlayer:WaitForChild("PlayerGui") --プレイヤの画面に表示

local textLabel = Instance.new("TextLabel") --表示する文字のハコをつくる
textLabel.Font = Enum.Font.SourceSansBold   --フォントをきめる
textLabel.Size = UDim2.new(0.7, 0, 0.3, 0)  --たてよこのサイズ
textLabel.Position = UDim2.new(0.5, 0, 0.5, 0) --中央ぞろえ
textLabel.AnchorPoint = Vector2.new(0.5, 0.5)  --基準を真ん中にする
textLabel.BackgroundTransparency = 0.6         --背景のとうめいど
textLabel.BackgroundColor3 = Color3.fromRGB(0, 0, 1) --背景のいろ
textLabel.BorderSizePixel = 5                  --枠線のサイズ
textLabel.Text = "GAME START"                  --表示する文字
textLabel.TextColor3 = Color3.new(1,1,0)       --文字の色
textLabel.TextStrokeTransparency = 0.5         --文字の輪郭の透明度
textLabel.TextStrokeColor3 = Color3.new(0, 0, 0) --文字の輪郭の色
textLabel.TextSize = 30                        --文字のサイズ
textLabel.TextScaled = true                    --わくにあわせる
textLabel.Parent = screenGui                   --画面のハコに文字をいれる

task.wait(5)

textLabel:Destroy()  --文字をけす
・UDim2.new(0.7, 0, 0.3, 0) (可変,固定,可変,固定)
画面にあわせる UDim2.new(0.7, 0, 0.3, 0)
画面こてい UDim2.new(0, 300, 0, 200)
・textLabel.AnchorPoint = Vector2.new(0.5, 0.5) –基準を真ん中にする
何もしない場合は、左上が基準
・よく使うフォント
GothamBlack GothamBold Gotham
SourceSans Cartoon
◆ミッション5 アイテムを使う
(3)本日のスキルアップ
Roblox:タッチイベントスキル
Roblox:イベントキルスキル
Roblox: 制御スキル
Roblox:瞬間移動パーツをつくる
local part = script.Parent
local goal = part.GoalPart.Value
local function onTouch(otherPart)
    local character = otherPart.Parent
    local humanoid = character:FindFirstChildWhichIsA("Humanoid")

    if humanoid then    -- 上に乗ったのがプレイヤーだったら
        game:GetService("RunService").Stepped:wait()
        local hrp = character.PrimaryPart
        hrp.CFrame = goal.CFrame
    end
end
script.Parent.Touched:Connect(onTouch)    -- Touched イベントの設定
■Robloxお仕事ミッション
・翻訳サイト(DeepL)
■FAQ
1.SongMakerで作成した音楽ファイルをRobloxで使うには?
①SongMakerで音楽を作る
②作った音楽をダウンロードに保存する
③下記の手順で音楽を取り込む
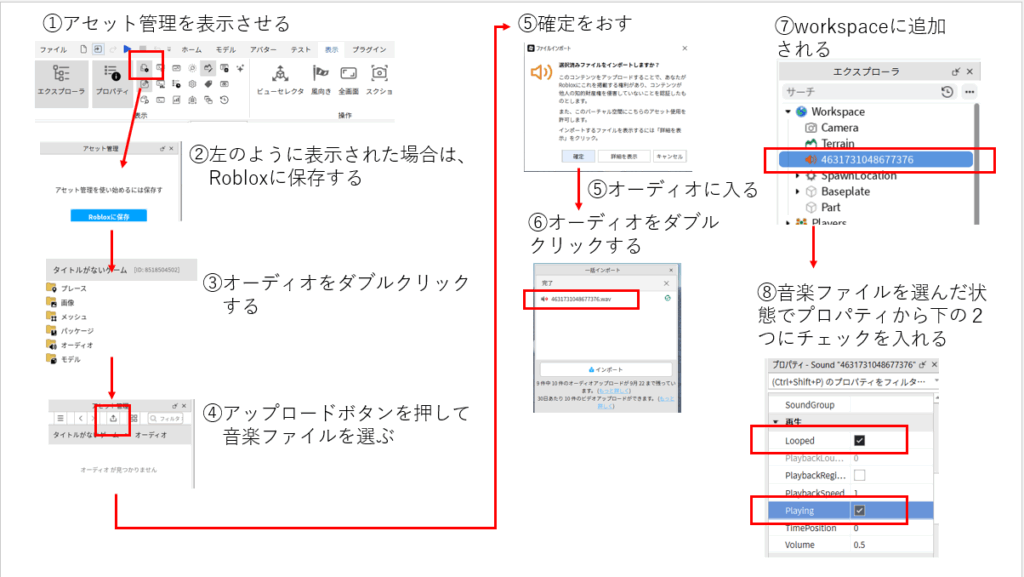
④ プレイをすると取り込んだ音楽が鳴ります
◆仕様 ある世界にある全てのものを消滅させろ!
① 世界にモデルを1つおく
② 下のプログラム1をつくる
③ 消滅させる街をつくる または 改造する
--プログラム1
--StarterPlayerの中にあるStarterCharacterScriptにLocalScriptを作って記述する
script.Parent.HumanoidRootPart.Touched:Connect(function(hit)
	-- 「ロックされていない」かつ「人じゃない」パーツだけを壊す!
	if hit.Locked == false and not hit.Parent:FindFirstChild("Humanoid") then
		hit:Destroy()
	end
end)
--改造する
① hit:Destroy() の部分を変更する
local boom = Instance.new("Explosion", workspace) -- 1. 爆発を作る
boom.Position = hit.Position -- 2. 場所を決める
boom.BlastRadius = 0 -- 3. 自爆を防ぐ(安全装置)
hit:Destroy() -- 4. パーツを消す
② 自分のスピードを WalkSpeed = 100 にしてみる
script.Parent.Humanoid.WalkSpeed = 100
もしくは、プロパティ仕様:マップ何に隠されている秘宝を探しだすゲーム
・マップサイズ:x:300 y:10 z:300
・秘宝 :球や四角のパーツでつくる
名前は「takara」とする
秘宝はスタートごとに位置が変わる
手順① BasePlateのサイズを変える  Sizeプロパティ
手順② Partで素材、名前をつける
--手順③ 秘宝にふれると消えるようにする
local takara = script.Parent
takara.Touched:Connect(function(hit)
local humanoid = hit.Parent:FindFirstChildWhichIsA("Humanoid")
if humanoid then
takara:Destroy()
end
end)
--秘宝をモデル化した場合
--手順③ 秘宝にふれると消えるようにする
local takara = script.Parent
local model = takara.Parent
takara.Touched:Connect(function(hit)
local humanoid = hit.Parent:FindFirstChildWhichIsA("Humanoid")
if humanoid then
model:Destroy()
end
end)
--手順④ 秘宝が出る位置をランダムにする このプログラムはどこに入れるとよい?
local x = math.random(-100,100)
local z	= math.random(-100,100)
takara.Position = Vector3.new(x,15,z)

--秘宝をモデル化している場合
local x = math.random(-150,150)
local z	= math.random(-150,150)
model:PivotTo(CFrame.new(x,15,z))
--ここまでの完成コード
--手順③ パーツ版:秘宝にふれると消えるようにする
local takara = script.Parent
local x = math.random(-100,100)
local z = math.random(-100,100)
takara.Position = Vector3.new(x,15,z)
takara.Touched:Connect(function(hit)
local humanoid = hit.Parent:FindFirstChildWhichIsA("Humanoid")
if humanoid then
takara:Destroy()
end
end)
--ここまでの完成コード
--手順③ モデル版:秘宝にふれると消えるようにする
local takara = script.Parent
local model = takara.Parent
local x = math.random(-150,150)
local z = math.random(-150,150)
model:PivotTo(CFrame.new(x,15,z))
takara.Touched:Connect(function(hit)
local humanoid = hit.Parent:FindFirstChildWhichIsA("Humanoid")
if humanoid then
model:Destroy()
end
end)--手順⑤ 秘宝を隠すための地形やモデルで世界をつくろう
1)地形エディタで色々な地形をつくる
地形 → 編集 → 描画 → 平準化 → モデルで装飾--秘宝をとると「ゲームクリア」を表示させよう
[しくみ]
1)プレイヤーがパーツに触れる 【サーバ側が処理】
2)触れたプレイヤーの画面に「ゲームクリア」を表示する 【ローカルが処理】
(1)ゲームクリアの画面をつくる
1)StarterGuiの+をおして「ScreenGui」を追加する
2)ScreenGuiの+をおして「TextLabel」を追加する
3)ラベルを調整する
・背景の色を変える BackgroundColor3
・ラベルをダブルクリックし、「ゲームクリア」にする(Textプロパティ)
・文字サイズを変える TextSize
4)調整がおわったらVisibleのチェックを外して見えないようにする
5)StarterGuiの+をおして「LocalScript」を追加する--(2)画面に表示させるプログラム(LocalScript)
local replicatedStorage = game:GetService("ReplicatedStorage")
local goal = replicatedStorage:WaitForChild("Goal")
local player = game.Players.LocalPlayer
local playerGui = player:WaitForChild("PlayerGui")
-- GUIの場所を正確に指定
local screenGui = playerGui:WaitForChild("ScreenGui")
local label = screenGui:WaitForChild("TextLabel")
-- 信号を受け取った時の処理
goal.OnClientEvent:Connect(function()
label.Text = "ゲームクリア!"
label.Visible = true
-- 5秒後に消す
task.wait(5)
label.Visible = false
end)
--(3)サーバからクライアントに送るメッセージをつくる
1)エクスプローラから「ReplicatedStorage」を探す
2)ReplicatedStorageの+を押して「RemoteEvent」を追加する
3)RemoteEventの名前を「Goal」にする
--サーバ側でプレイヤーが秘宝にふれた処理
local takara = script.Parent

local x = math.random(-100,100)
local z	= math.random(-100,100)
takara.Position = Vector3.new(x,15,z)

local replicatedStorage = game:GetService("ReplicatedStorage")   --追加
local goal = replicatedStorage:WaitForChild("Goal")              --追加

takara.Touched:Connect(function(hit)
	local humanoid = hit.Parent:FindFirstChildWhichIsA("Humanoid")
	local player = game.Players:GetPlayerFromCharacter(hit.Parent) --追加

	if player then                  --変更
		goal:FireClient(player)     --追加
		takara:Destroy()
	end
end)【仕様】じゅうたんに乗ると、自由に飛び回ることができるアイテム
プレイヤーが座ることができる「Seat」パーツを使う
(1)じゅうたんパーツを用意しよう
手順1)エクスプローラの「Workspace」の+を押す
手順2)Seatを選ぶ
手順3)Workspaceの中にSeatパーツが増える
手順4)素材や色、サイズをつけよう
手順5)実行してSeatパーツに触れて、どんな動きをするか確認しよう
(2)じゅうたんを動かしてみよう
動かすための物理のエンジンパワーが必要です(Robloxでは「LinearVelocity(リニアベロシティ))
手順1)動かすためのエンジン(LinearVelocity)を追加する
Seatパーツの+をおし「LinearVelocity」を選ぶ
手順2)エンジンとパーツをつなげる「Attachment」を追加する
Seatパーツの+をおし「Attachment」を選ぶ
手順3)エンジンとAttachmentをつなげる
①LinearVelocityのプロパティから「Attachment0」を探す
②見つけたらAttachment0の右側の箱をクリックする
③マウスカーソルが変化するので、エクスプローラのAttachmentをクリックする
④Attachment0の右側の箱に値が入り、エンジンと接続が完了
手順4)Seatパーツの+をおし「Script」を追加しよう
手順4)下記のプログラミングする-- 1. 必要なパーツ(エンジン)を取得
local seat = script.Parent
local velocity = seat:WaitForChild("LinearVelocity")
-- 2. 設定の初期化(プログラムから物理設定を強制的に上書きします)
velocity.MaxForce = 100000
velocity.RelativeTo = Enum.ActuatorRelativeTo.World -- 世界の軸に合わせて動く設定
print("魔法の絨毯テスト開始:Seatに座ってください")
-- 3. プレイヤーが座るのを待つ処理
seat:GetPropertyChangedSignal("Occupant"):Connect(function()
if seat.Occupant then
print("プレイヤーが座りました!5秒間の動作テストを開始します。")
-- 【テスト1】上にふわりと浮く (Y軸に5)
velocity.VectorVelocity = Vector3.new(0, 5, 0)
task.wait(2)
-- 【テスト2】前に進む (Z軸に-10) ※RobloxではマイナスZが前方向
velocity.VectorVelocity = Vector3.new(0, 5, -10)
task.wait(2)
-- 【テスト3】停止
velocity.VectorVelocity = Vector3.new(0, 0, 0)
print("テスト完了。正常に動きました!")
end
end)(2)矢印キーで動かせるようにする
キーで操作するには、下記のしくみの理解が必要です。
【クライアント側】 → 【サーバ側】
キーが押されたのを検知する 押された情報を受け取りパーツを動かす
準備)
①Workspaceの+を押して「Seat」パーツを追加する
②クライアント側で制御するためにSeatの+を押して「Script」を追加する
③クライアントとサーバとのやり取りをするため、Seatの+を押して「RemoteEvent」を追加する
④RemoteEventの名前を「MoveEvent」に変更する
⑤キー操作をするために「StarterPlayerScripts」の+をおして「LocalScript」を追加する
--クライアント側
--キー操作のプログラム(StarterPlayerScriptsのLocalScript)
local UserInputService = game:GetService("UserInputService")
local seat = game.Workspace:WaitForChild("Seat")
-- Seatの中にあるリモートイベントを見つける
local moveEvent = seat:WaitForChild("MoveEvent")

UserInputService.InputBegan:Connect(function(input, gameProcessed)
	if gameProcessed then return end

	-- ↑キーが押されたら、リモートイベントでサーバーに「Up」と送る
	if input.KeyCode == Enum.KeyCode.Up then
		moveEvent:FireServer("Up")
	end
end)
local seat = script.Parent
local moveEvent = seat:WaitForChild("MoveEvent")
-- LocalScriptから「Up」という合図が届いたとき
moveEvent.OnServerEvent:Connect(function(player, keyDirection)
if keyDirection == "Up" then
-- サーバー側で位置を動かす
seat.Position = seat.Position + Vector3.new(0, 0, -5)
end
end)キーで操作する
[サーバ]
if keyDirection == "Up" then
-- サーバー側で位置を動かす
seat.Position = seat.Position + Vector3.new(0, 0, -5)
end
[クライアント]
if input.KeyCode == Enum.KeyCode.Up then
moveEvent:FireServer("Up")
end
※キーの例
上向き矢印キー ・・・ Enum.KeyCode.Up 下向き矢印キー ・・・ Enum.KeyCode.Down
左向き矢印キー ・・・ Enum.KeyCode.Left 右向き矢印キー ・・・ Enum.KeyCode.Right
スペースキー ・・・ Enum.KeyCode.Space 他のキー(例:w)・・・ Enum.KeyCode.W